How to Install Your LED Flex Neon Sign
This is a brief guide on how to install your LED Flex Neon Sign, not to be confused with installing a real neon sign as this can be a very different process. If you do not feel confident doing this we suggest asking someone who is more confident they can carry out the task safely.
You will need a few things before you start.
- A basic level of DIY ability.
- Drill.
- Stud/Electric Cable Finder/Digital Detector.
- Level.
- Pencil.
- Screwdriver.
- Screws.
- Suitable wall fixing depending on the wall type. (Plastic Wall Plug or cavity wall fixing).
- Sign Hardware (Supplied by A1deSIGNS – Sign Supports Or Hanging Chain).
- The LED Flex Neon Sign.
Step 1 – Positioning your LED Flex Neon Sign.
Possibly the most important step of all. We are pretty sure you had an idea of where you wanted the sign to go before you ordered, but now is a good time to make sure you were right. Get someone to hold the sign in place (be careful not to drop it acrylic can break when dropped), step back and check that it will look right, you can even get the sign lit up whilst it’s being held in place. Check that it doesn’t look better somewhere else alternatively you can always order another one for that awesome spot you just found. Usually, the same height you would put a picture is best and equidistant between objects on either side.
Once you have found your position you can use a level on the edge of the rectangular panels, or you can use the level running along the bottom line of the text to get things looking as they should. Sometimes things don’t always look right level, so deliberately putting things at a slant can give your LED Flex Neon sign that quirky feel.
Hopefully, now you have things where you want them, mark the fixing holes in the acrylic panel with a pencil. This should give you several circles marked on the wall when you take down your sign.
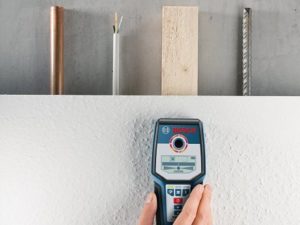
Checking for cables and pipes before installing your LED Flex Neon Sign
Step 2 – Drilling
With your holes marked on the wall from step 1, check the location of the marks with a digital detector to make sure there are no cables or pipes where you will be drilling. You can now drill a hole in the middle of each of the circles. Ensure you are using the correct fixing for your wall type and the correct size drill bit for the fixing.
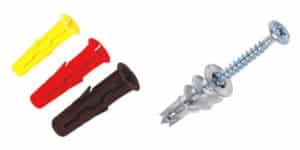
Wall plug or Plasterboard fixing for your LED Flex Sign in place
Step 3 – Fixing
Once you holes have been drilled insert the wall fixings, then unscrew the head of the sign support and slide the screw down the cylinder until the thread has come through the other end. Insert your screwdriver down the cylinder until it sits in the head of the screw, carefully fasten the screw into the wall fixing being careful not to overtighten. Repeat this for each of your fixing points.
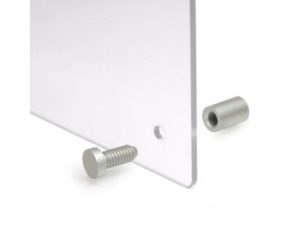
Sign Support to secure LED Flex Neon Sign in Place
Step 4 – Secure
With all your sign supports in place on the wall, take the previously removed heads and insert them into the hole in the acrylic panel, then offer the panel up to the fixing point for that hole and fasten in place, leave the fixing slightly loose until all fixings are in place, as this allows the panel to move around to ensure you can get all fixings in place. Once all fixings are in place tighten up the fixings so they hold the panel securely, don’t overtighten them or bend the acrylic as it can cause it to break.

Smiley LED Flex Neon Sign
Step 5 – Let There Be Light
Once the sign is secured in position it is now time to deal with the cabling. If your sign comes in multiple pieces, make the connections between each part of the sign. Each sign comes with a 1.5m clear cable from the bottom that has a female power connector, you can either just let this hang or secure the cable in place with cable clips, other options are available but may require a skilled professional to install the sign. You can then take the transformer and plug the male end into the female clear connector and plug the transformer into a nearby socket. If you have a dimmer this will go in-between the male and female connections.
We hope you have found this guide useful and hope you enjoy your LED Flex Neon Sign.
We do not accept any liability for damage or injury arising from following this guide, all due care and attention should be applied when installing your sign, if you do not feel confident please ask someone who is.